Anna Grossnickle Hines                                                                                    Home    Guide
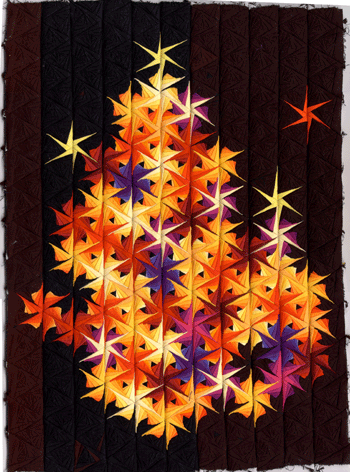
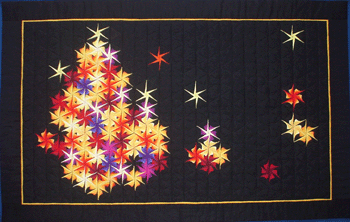
Creating the
Solstice Quilt

For this quilt and others involving flames I was intrigued by the twisted log cabin patterns. The shapes and movement suggest dancing and flickering flames, particularly when done in bright colors on a black background. I bought Barbara Kaempfer's book, LOG CABIN WITH A TWIST, published by American Quilter's Society, and studied the quilts and techniques used to create them. Three quilts in the book that particularly appealed to me when considering my flame quilts are "Windmills" and "Waves", both made by Käthy Gubler, of Switzerland, and "Feuer" (Fire) by Esther Kronenberg, also from Switzerland.

People often remarked at the small size of the quilts I had done for PIECES, but after seeing the work of George Siciliano at the Lancaster quilt show I knew it was possible to work much smaller! I wanted to be able to work that small to get as much detail and movement as possible in my quilts for WINTER LIGHTS. I spoke with George, who often wins top prizes for his miniatures, and he told me he first designs on the computer, then begins to sew. I decided I needed to learn to make better use of my computer.

All images and text © Anna Grossnickle Hines 2005

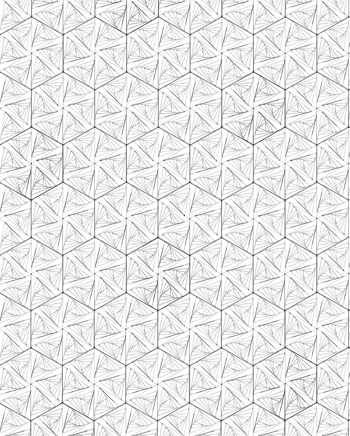
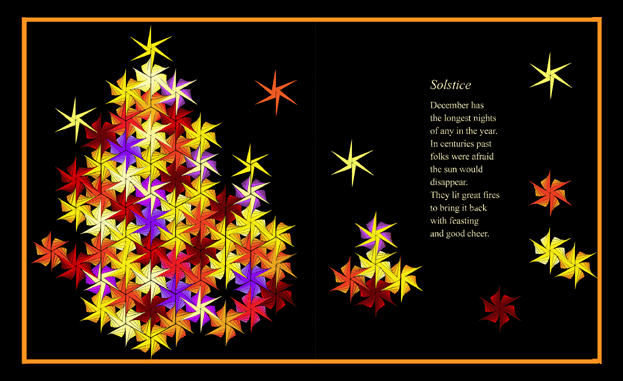
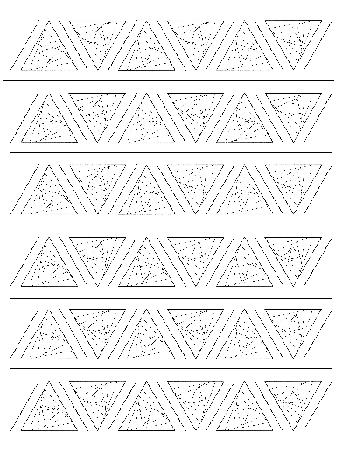
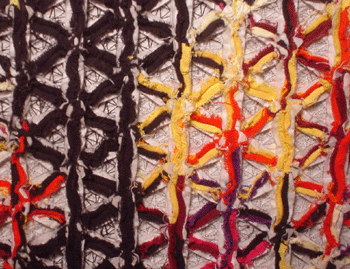
I chose to use the twisted triangle to create my solstice. I drew my triangle in PhotoShop then copied and turned it, putting six together to make a hexagon. I copied the hexagon over and over, and joined them together to make a full page. The sheet shown above is two columns less than half the complete quilt. The quilt is 26 columns of 25 triangles each. As you can see, in each column one triangle is cut in half to make the outside edge even.

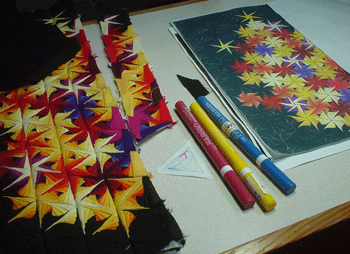
Once I had this grid I used the "fill" tool in PhotoShop to put color in the spaces. While I worked I kept a white background behind my line layer so I could see the spaces to "fill". To check how I was doing I would "hide" this white layer and look at the colored spaces against a black background.

Of course, I often wanted to make changes and try other possibilities. I found I could do this by making a new copy of my single hexagon without any color, fill it with whatever colors I wanted then "drag" it into my design and put it wherever I wanted. I could do this dozens of times and end up with dozens of layers which I could then move around, and "hide" or show with a simple mouse click, trying different combinations forever!


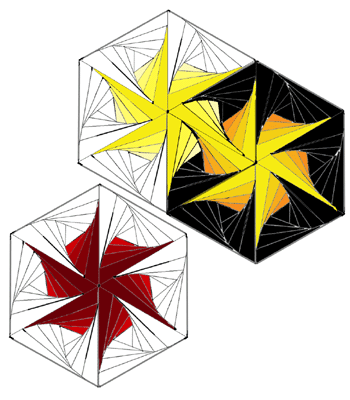
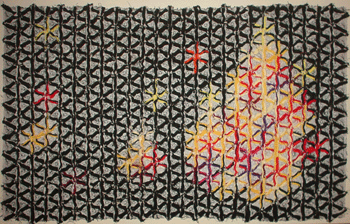
Below is my final choice with the white "working" background on the right half and the black background on the left.
Above is the final design. Though I wasn't sure how well the piecing of all those black triangles would show up in the printing I felt it was important to stitch all 13 sections of each one so the back ground would have the same hefty body as the colored areas. All those layers make each little triangle quite thick and when sewn together make this a quilt that can practically stand alone.
Once I had the design I needed to choose my colors--a variety of bright gradients. It would have been helpful if I had known how to dye fabrics at this point, but I was not ready to tackle that. So I did a lot of shopping. A lot of shopping! After a search with my mother in southern California in August, I found in that ThimbleCreek in Walnut Creek, California had the best selection of solid colors and spent hours there making my selections..
I copied my triangle pattern and created a sheet which I could print on Fundation™, for foundation piecing. Using Fundation™ instead of paper meant I would not have to do the tedious--if not impossible working this small--job of tearing away the paper when I was done.

Each length of each side on these triangles is 1 3/8 inches.

The first of October, I finally started sewing. It was easy to get my colors in the wrong order or going in the wrong direction--especially since with foundation piecing the right side is the wrong side! I made a lot of mistakes until I developed a system, and even then I had to be on my toes. I placed the foundation for next triangle to be pieced printed side down ("right" side up). Following my printed design, which is also "right" side up, I used fabric markers to indicate the color for each section of the triangle and whether the colors went light to dark or dark to light.
I then selected the appropriate color sets and sewed the triangle, always starting with a little black triangle for the center and working around to the outside.

I sewed two columns of triangles together--the nice bright ones, but they looked terrible. I had unwisely used black thread which darkened the light colors too much.

Plus the layers made the thickness of the edges of the pieced triangles uneven, so no matter how carefully I held them, they slipped when I sewed them by machine. The centers of the stars were off just a tiny bit, but it was a tiny bit too much.

I ripped the rows apart, salvaged the triangles I could and started over. This time I used light thread to piece the blocks and basted each seam before sewing the blocks together.

It was taking me 25-30 minutes to sew and connect each triangle! During the day I would sit at my machine and piece the triangles. In the evenings I would sit with my husband and do the basting. Basting one row to another took another hour and half.

It was slow tedious work for sure, and I was eager to some of the other quilts started. I needed to see faster progress! In mid-October, with just five rows done, I started my Lucia quilt.

Then I worked on the Christmas Tree quilt and Nian, and Aurora Borealis, sewing Solstice triangles in between, a few days at a time. I kept a diary during these months, attempting to track my hours and by January 26 I noted that I had spent approximately 188 hours to do 11 rows and 7 triangles.

In March I had finished half of Solstice, plus the four quilts named above and was working on Protest. I took them all with me on a trip to New York. The crew at Greenwillow was happy to see them.

Since it was mostly black triangles the second half of the quilt did not take as many hours as the first. I managed to work up to piecing as many as six black triangles in an hour. It still took a few more hours to baste and stitch them into a strip and baste the strip to the quilt carefully matching every point. A total of 8 to 10 hours per strip.

In late June I finally finished Solstice, as well as Protest, Artist and Lights Out. Eight quilts done and seven to go.

I should probably not confess this, but I will. I stupidly got a tiny spot of chocolate on one of the yellow stars in that little cluster in the center. And even more stupidly, I tried to clean it off and, of course, the colors ran. By the time I finished I had involved three rows that I had to take apart and repair.

The back of this quilt is almost as interesting as the front.

A close up shows the stitching on the white Fundation™. I did my best to press the seams flat, but all those layers made it difficult.
The quilt certainly didn't need any batting to give it body, but I did need to find a way to give an equal thickness to the border. I layered batting between strips of muslin and quilted them together. Then cut them down the center to make matching borders of the right dimensions.
I left the muslin wider along one edge of each border piece, butted the batting against the edge of my quilt and basted this muslin flap to the back of the quilt.
Then I turned it to the front and stitched the seam with a wide zigzag.
Finally, I added my narrow color and wide black border fabric.
Because people were so fascinated with the back of this quilt, I finished it with a "trap door" so it can be seen.
My best estimate is that I spent about 400 hours on this quilt--not including the time working out the design. But now that I had done one 8450 triangle quilt, I was sure the other I planned to do would go faster. One should never be so smug!


With this quilt less than half way done, I started
Lucia.

Winter Lights Page
About the Winter Lights Holidays
Quilting Glossary and a Bit of History
Quilts, Dolls, and Books
Quilts in the Classroom
Quilter's Page
Book Page
Top of Page
Home
Guide