| Note: You may want to trace
the pattern onto a piece of freezer paper. Ironing the fabric onto
the shiny side of the paper will help hold it in place. Be sure to
put your marks on the papery side, not the plastic side.
Directions for Fabric Pumpkin:
-
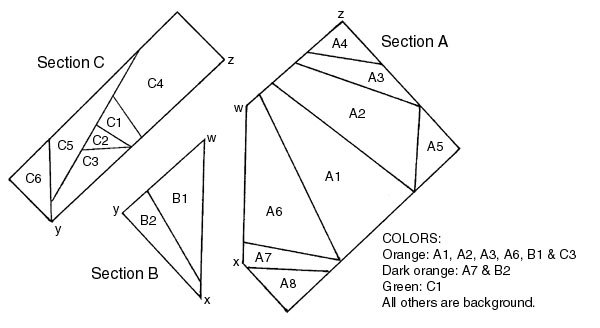
Cut out the Pattern for Fabric Pumpkin Sections A, B and
C, adding 1/4 inch seam allowance on outside edges.
-
Cut a piece of orange pumpkin fabric large enough to cover
space A1 with at least 1/4 inch seam allowance on all sides. Place
the fabric on the back of the pattern covering the space. The right
side of the fabric should face away from the pattern. (If you are
using freezer paper, you can press this piece in place.)
-
Cut a piece of pumpkin fabric large enough to cover space
A2 plus seam allowances. Place this fabric right sides together with
piece A1. Remember you will be doing this on the wrong side of
the pattern.
-
Holding the fabric in place, turn the pattern line-side up
and sew along the line between A1 and A2. Open the seam and check to see
that the fabric covers space A2.
-
Fold the pattern along the seam line, and trim the seam to
1/8 inch. Unfold and press.
-
Repeat steps 3-5 for spaces A3 through A8, using the appropriately
colored fabrics.
-
Construct Sections B and C.
-
With right sides facing, join sections A and B at points
w
and x. Sew the seam between the points. Press open.
-
With right sides facing, join Section C to Sections
AB at points y and z. Sew and press open.
Go to suggestions for framing. |